
 Русский
 Español
Meat Curing Chamber in home settings
More often than not, I find myself to be the underserving subject of praises from my friends on my «sophisticated» abilities to dry-cure the high-prized Old World meats at home. Yet, if a basic setup for the meat curing chamber would require special knowledge or skills, I’d be the last person on the list of «artisan charcuterie masters.» I’ve never been a boy who builds a miniature nuclear reactor as a summer science project or even a guy who owns an air compressor. So, if I can do it, so is everyone…
Of course, there are few companies on the market — especially in Europe — who would sell you a finely designed Dry-Curing Chamber, ready to accept future saucisson secand prosciutto. The only difference is a price. Instead of paying the equivalent of slightly used vehicle, by following my directions you would spend $ 200−250 to possess a fully functional and simple to use Chamber.
Hence, what conditions are needed to dry-cure any salami, chorizo, or a 3 years old ham? More or less, the same: temperature between 10−15C (50−60F), 70−80% humidity, and some airflow. That’s all…
For millennia’s, our ancestors — especially those around Mediterranean — had to submit themselves to the complicated manipulations with meats that required skill and carefully transmitted knowledge. Caves, areas of high elevation, basements, magical operations with opening and closing windows — it was done all to achieve these parameters. Since these conditions are harder to attain in North or North-East, a smoke had to be introduced as an additional preservative. That’s in the case if you’ve wondered why most of salamis are not cold-smoked unlike the traditional products of — let’s say — Germany or Poland.
Thus, all you need to do:
1) First of all, get a non-frost refrigerator. Any non-frost refrigerator… My first Curing Chamber was made from a lonely and abandoned unit in my office’s dining area. It did require few applications of bleach and antibacterial cleaner, but I did not have to pay for it.
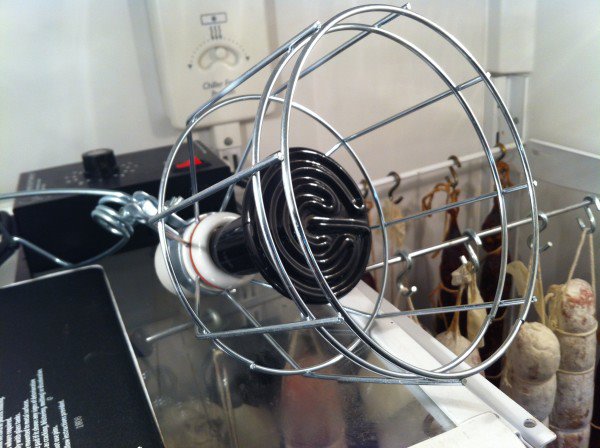
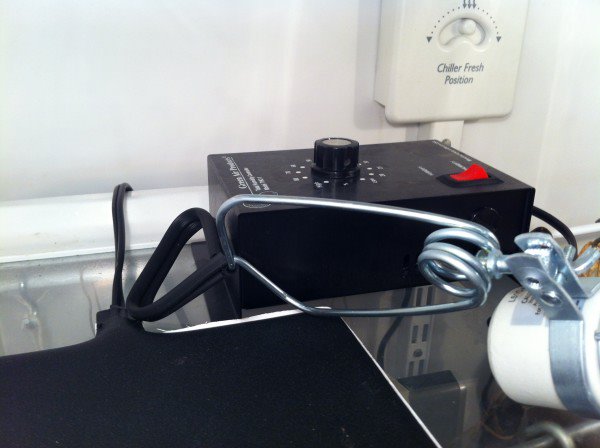
2) Buy a temperature controller. The omniscient Google can show you a number of different ones and omnipotent Amazon can sell it to you for around $ 30−50. It works pretty simply. Drill a hole or find a way to put a probe inside of the fridge, set the temperature (12C
3) The same principle applies for controlling humidity. You’ll need a humidifier controller (they are bit more pricy than temperature ones, although there are number of models that work both as temperature and humidity controllers) and an ultrasonic humidifier. Plug the humidifier to the controller and controller to electrical cord, set the humidity, and you’re set. Ideally, the humidity at the beginning of dry-curing should be around or a bit above 80% with slow descend to 70%. Yet, since there are typically many items in the Curing Chamber — remember, it’s no longer a humble used fridge — on different stages of preparation, it’s more practical to set the humidity at 75%. You’ll not notice any difference in the final product. Remember, when those Calabrian artisans were for centuries measuring the humidity with the fine instrument by the name of their noses, few percent higher or lower did not matter much…
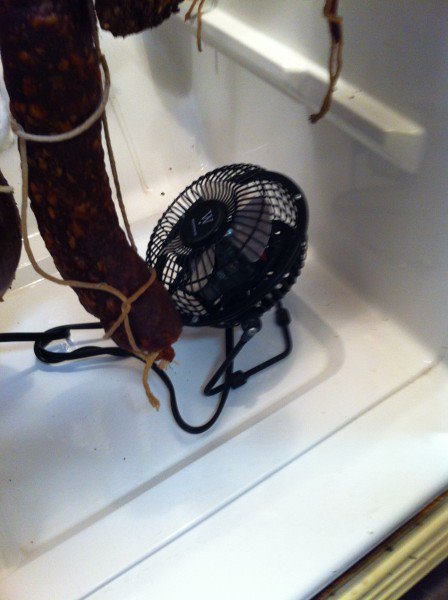
4) For the airflow, buy a small fan; computer fan or any other of the similar size works great. Some install it into the wall of the fridge. Some — and I’m among them — just connect the fan to the humidifier controller inside of the chamber. This way, when the humidifier turns on, the fan does the same and provides sufficient flow of air. And if you check on your meats periodically — it’s a daily ritual for me upon arriving home — the Chamber will receive all the fresh air it needs.
5) You’ll also need a source of subtle heat. It needed for forcing the fridge to cycle in moderate weather to prevent the humidity to go too high and to reach the needed temperature when it’s cold. A heating matrass for reptiles or a lamp that omits heat without light (both can be bought at any pet store) work great.
6) You’ll also need a temperaturehumidity sensors would not hurt either…
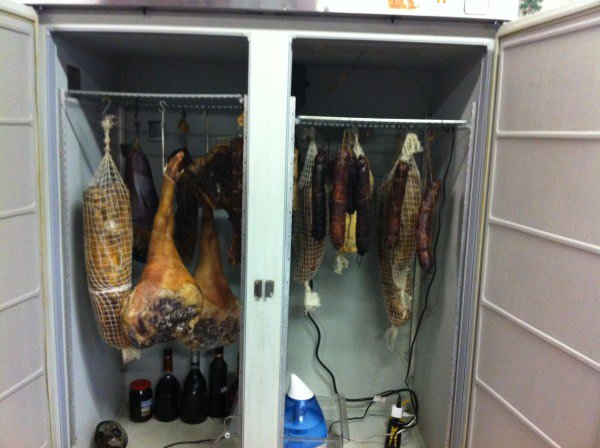
Of course, this simple scheme can be improved. Yet, it’s all that you will need to set up fully working conditions to produce plenty of finocchiona or pancetta that more than often taste much superior those overpriced products you see in some specialty stores. I do not even want to start on the topic that what you find in supermarket’s Deli, sold as «salami,» or «ham» has nothing even close to do with a proper dry-cured product. You will need to learn some basics about cultures, cures, fermenting, and get some authentic or tasted recipes. But that’s another topic…
Sergey Dezhnyuk
for MeatReview.com
I’m with you. With advice like this and other pages, I am using an unused chest freezer as a drying chamber. The temp/humidity controller is the only specialized item I have. I am not committed enough to drill holes or mount fans yet (and on chest freezers I think the only safe place to make a hole is on the top). I did find the humidity runs high — especially as the meat first goes in. I currently have the lid cracked with a piece of wood and a fan inside running constantly, but with the ambient weather in NorCal this time of year the freezer rarely cycles. I did find that when the humidity was running high taking the non-cycling humidifier out did help some. Planning on using a ceramic heating element if it cools off more, but running the fan on low constant inside the cracked chamber seems a good fix for now. I have 2 temp/humidity sensors that are in different parts of the chamber and had a wide variance before using the fan, but now have good agreement (one sensor for the controller and 1 which communicates via bluetooth with my phone so I can monitor from afar). Thanks for giving me the confidence to jump right in and start curing. A lonzino and bresaola are in now and 2 coppas are going in next week (I think I will let them dry some at a cool temp outside the chamber for 36 hours or so before they go in). It won’t be long before I am grinding meat…
Thanks for your feedback.
And as for pre-drying, I always after curing any product, before smoking (if there is one), I will prevent it in a dark room under a small fan for 2 days, the temperature there is 17−22C, that is, usual for drying and fermentation, this will greatly reduce time spent in the climate chamber.
Вот это классно, я прям загорелся, спасибо. Холодильник есть завтра буду мудрить.